Toon Shaders
Toon Shader (legacy)
Legacy Shader
This version of the Toon shader is now legacy and will no longer be updated. It is recommended to use the Version 2 of the shader instead.
ORL Shaders package comes with a fully-featured Toon shader geared towards use in VRChat. It is based on XSToon, which is a shader package that aims to mimic the lighting of Standard shader with Toon features like Ramp, Rim Lights, Outlines and so on added on top.
You can find the toon shader under orels1/Toon/Main in the shaders list.
Transparent and Cutout Variants
This shader has a Transparent and Cutout variants under orels1/Toon/Transparent and orels1/Toon/Cutout respectively. For things like Hair with partial transparency an orels1/Toon/Transparent PrePass shader is recommended
 Example of the Toon shader in action
As you can see, there are a lot of features packed into this shader. But do not fret, most of them are disabled by default, so you can pick and choose what suits your needs.
This documentation is broken up into modules that correspond to the foldouts in the shader inspector so you can easily find them.
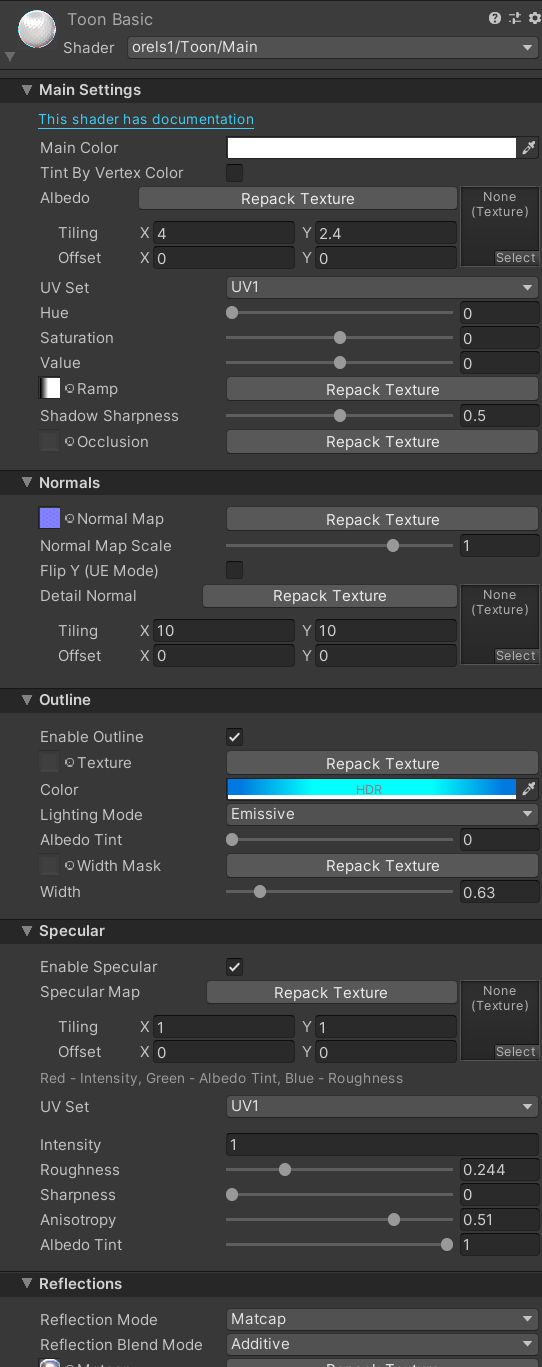
Main Settings
 Main Settings of the Toon shader
- Main Color: Controls the tint of Albedo texture
- Tint By Vertex Color: Enables tinting of albedo by meshes' vertex colors
- Albedo Texture: The main texture of the material
- UV Set: Controls the set of UVs used by most effects, unless otherwise specified
- Hue: Controls the hue shift of the material
- Saturation: Controls the saturation of the material
- Value: Controls the value of the material
- Ramp: Controls the ramp texture used for the Toon effect. Uses black-to-white grayscale gradient by default. You can supply a fully white texture to avoid being shaded by lighting.
- Shadow Sharpness: Controls the sharpness of realtime shadows
- Occlusion Textures: The main Ambient Occlusion texture of the material
- Occlusion Strength: Controls the strength of the occlusion effect
- Occlusion Mode: Controls how occlusion is applied
- Classic: Multiplies the indirect lighting by occlusion (light coming from baked Lightprobes)
- Integrated: Offsets the ramp by the occlusion value, will look more coherent with the rest of the lighting
Shadow Sharpness 0 vs 1
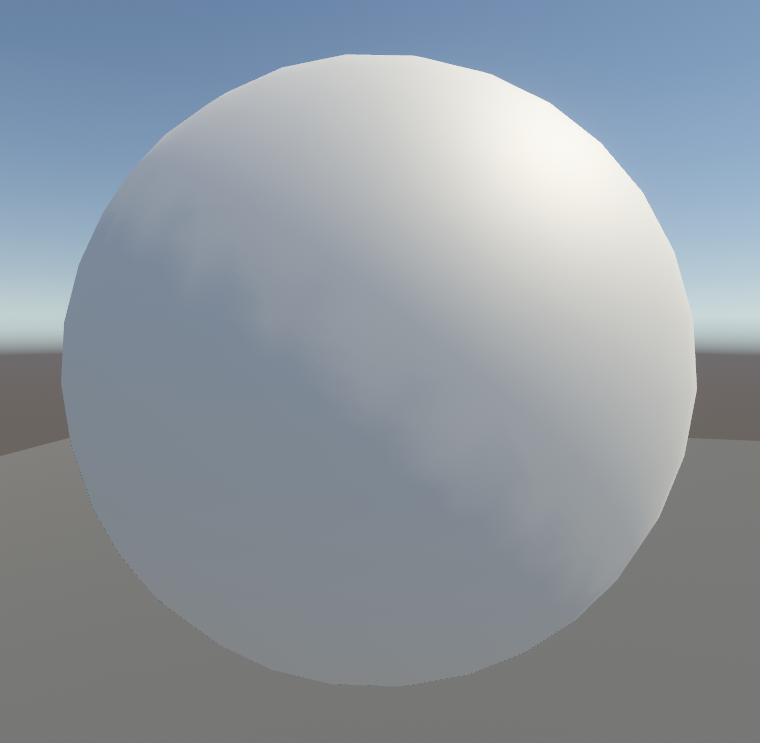 Shadow Sharpness 0
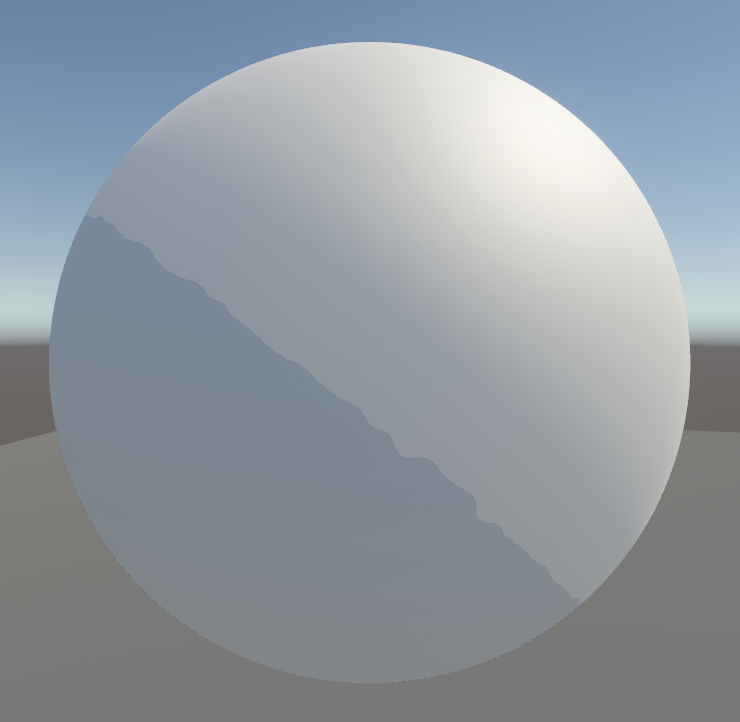 Shadow Sharpness 1
Normals
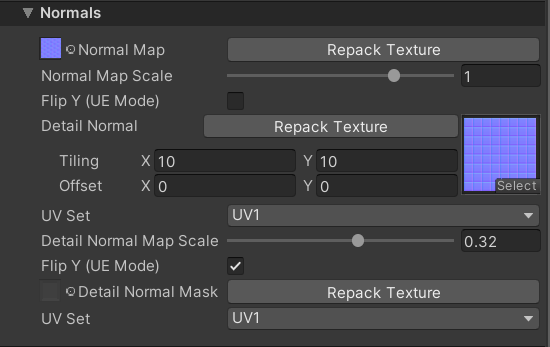 Toon Shader Normals
- Normal Map: The normal map of the material
- Normal Map Scale: Controls the strength of the normal map, and can be used to flip the direction as well
- Flip Y: Flips the Y axis of the normal map, this allows usage of DirectX-based normals
- Detail Normal: The extra normal map texture to be applied on top. Has its own tiling controls
- Detail Normal Scale: Controls the strength of the detail normal map
- Flip Y: Flips the Y axis of the detail normal map
- Use Bicubic Sampling: Enables a more expensive but higher quality normal map sampling mode. This can be useful for lower resolution/more aliased normal maps.
- Detail Normal Mask: The mask texture for the detail normal map. Allows you to control where the detail normal is applied
- UV Set: Controls which UV set the Detail Normals will use
Outline
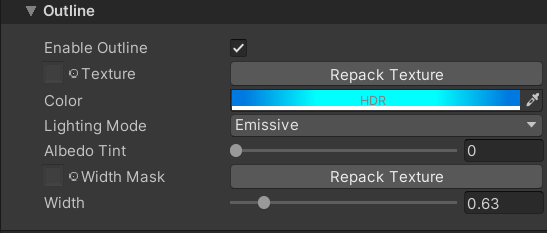 Toon Shader Outline
- Enable Outline: Enables the outline effect
- Texture: Controls the outline color
- Color: Controls the tint of the outline texture
- Lighting Mode: Controls how the outline is lit. Defaults to Lit
- Lit: Uses environment lighting to light the outline
- Emissive: Uses the outline color directly
- Albedo Tint: Controls how much the outline is tinted by the albedo texture
- Width Mask: Controls the widths of the outline via the red channel of the texture. It will multiply the Width value by the texture value
- Width: Controls the width of the outline
- Adjust by Vertex Color: Enables adjusting the width of the outline by the vertex color of the mesh. Uses the red channel of the vertex color and multiplies the width by its value.
- Ignore Stencils: Skips the stencil test for the outline.
- This is useful when you want to see outlines on top of the surface of your mesh instead of just around it. E.g. if you have clothing with folding details or things like buttons, you can use this to outline them as well.
Outline Approach
ORL Toon uses a pass-based outline, which avoids using geometry shaders, but will have visual splits on hard edges. It does benefit from using stencils, on the other hand, so it works in the Transparent mode as well.
Specular
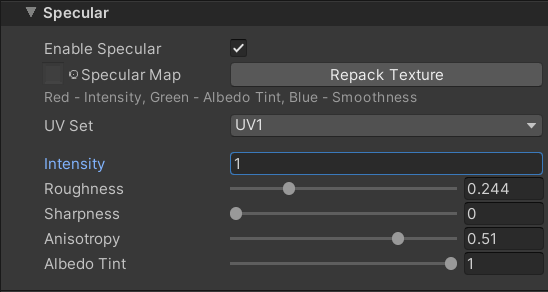 Toon Shader Specular
- Enable Specular: Enables the specular effect
- Specular Map: Controls various specular properties of the material. Will be multiplied by the respective values from sliders below
- Red Channel: Controls the intensity of specular
- Green Channel: Controls the amount of specular albedo tint (makes the specular more metallic)
- Blue Channel: Controls the smoothness of the material when applying specular
- UV Set: Controls the UV channel used when sampling the Specular Map
- Intensity: Controls the strength of the applied specular
- Roughness: Controls the roughness of the surface when calculating specular. The rougher - the more diffuse the specular will be
- Sharpness: Controls the sharpness of the specular highlight, when fully sharp - specular will become a flat colored circle, works well for glossy effects
- Anisotropy: Controls the amount of anisotropic bending applied to the specular. Anisotropy depends on the UV layout of the mesh, and will break up on UV seams. this is limitation of Unity's Tangent calculations
- Values Below and Above 0 bend the specular in different directions
- Albedo Tint: Controls the global level of specular albedo tint
Reflections
Reflections in ORL Toon have 3 modes: PBR, Baked Cubemap and Matcap.
- PBR Reflections follow unity's Metallic-Smoothness workflow and will look very similar to the built-in Standard shader reflections
- Baked Cubemap work the same way as PBR but use a pre-defined Cubemap texture instead of the environment's Reflection Probes
- Matcap uses a Matcap texture to simulate reflections. Can be used for many artistic effects
There is one global setting shared between all 3 modes:
- Reflection Blend Mode: Controls how reflections are composited on top of the material. Defaults to Additive
- Additive: Adds reflections on top of the material
- Multiply: Multiplies reflections with the material
- Subtract: Subtracts the reflections from the material
99% of the time you'll want to use the default, unless you have a special effect in mind.
PBR Reflections and Baked Cubemap
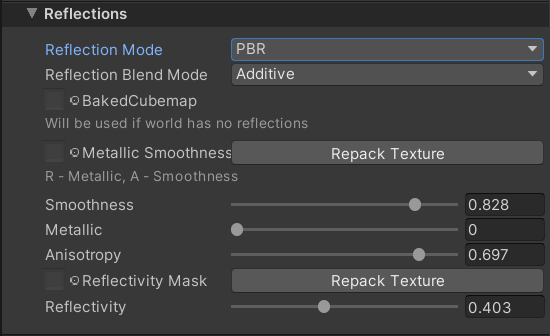 Toon Shader Reflections
Since PBR and Baked Cubemap work the same way, we'll cover both of them here
- Baked Cubemap: The Cubemap to be used in Baked Cubemap mode or in PBR mode when no reflection probes are present in the environment.
- Metallic Smoothness Texture: Controls the metallic and smoothness parameters of the material when sampling reflections. Works the same way Unity Standard Shader metallic-smoothness texture works.
- Smoothness: Controls the smoothness level of the surface
- Metallic: Controls the metallic level of the surface
- Anisotropy: Controls the bending of the sampled reflection. Values Above and Below 0 bend the reflection in different directions
- Reflectivity Mask: Controls the reflectivity of the material via the red channel of the texture. It will multiply the Reflectivity value by the texture value
- Reflectivity: Controls the reflectivity of the material
Matcap
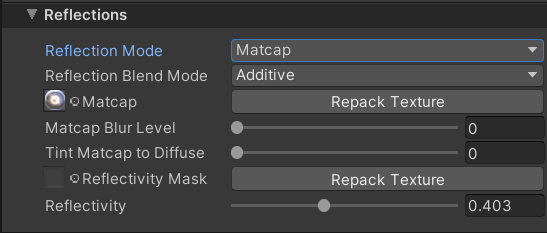 Toon Shader Matcap
- Matcap: The matcap texture to use
- Matcap Blur Level: Controls the blurring of the matcap. Implemented by sampling a lower mip which can be a bit low quality for very reflective surfaces, use artistically
- Tint Matcap to Diffuse: Controls the amount of albedo tint applied to the matcap. Can be used to nicely blend matcap into the underlying material
- Reflectivity Mask: Controls the reflectivity of the material via the red channel of the texture. It will multiply the Reflectivity value by the texture value
- Reflectivity: Controls the reflectivity of the material
AudioLink
ORL Toon supports AudioLink and provides a couple of different effects for you to choose.
There are some settings that are shared between all the modes
Single Channel
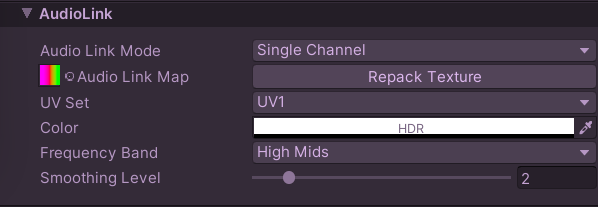 Toon Shader AudioLink Single Channel
The most basic mode, pulses the material with a selected color, based on the intensity of the selected channel. Has a Mask Map to control which areas of the material are affected.
- AudioLink Map: The mask texture to control which areas of the material are affected by the AudioLink effect
- UV Set: Controls the UV channel used when sampling the AudioLink Map
- Color: Controls the color of the effect
- Frequency Band: Controls which frequency is used to perform the pulsing
- Smoothing Level: Controls the amount of smoothness to add to the Audio Link data. Helps to reduce the "jerkiness" of the effect
Packed Map
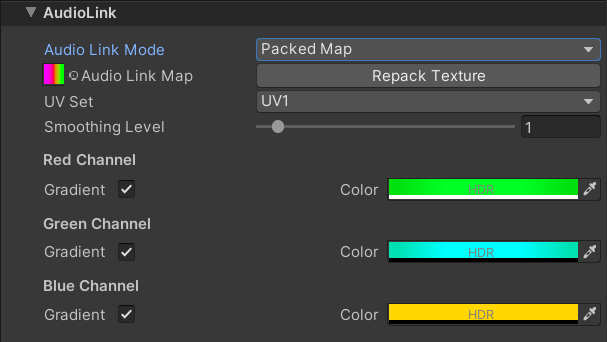 Toon Shader AudioLink Packed Map
Packed map is a more advanced mode of AudioLink effect, which allows you to pulse different areas off the material based on different frequencies, as well as show a VU-Meter-like effect in the Gradient mode.
- AudioLink Map: The mask texture to control which areas of the material are affected by the AudioLink effect.
- Red Channel: Will pulse based on the intensity of Low Frequency band
- Green Channel: Will pulse based on the intensity of Mid and High Mid frequency bands
- Blue Channel: Will pulse based on the intensity of High Frequency band
- UV Set: Controls the UV channel used when sampling the AudioLink Map
- Smoothing Level: Controls the amount of smoothness to add to the Audio Link data. Helps to reduce the "jerkiness" of the effect
- Red Channel
- Gradient: Enables VU Meter effect for the elements colored Red in the AudioLink Map
- Color: Controls the color of the effect
- Green Channel
- Gradient: Enables VU Meter effect for the elements colored Green in the AudioLink Map
- Color: Controls the color of the effect
- Blue Channel
- Gradient: Enables VU Meter effect for the elements colored Blue in the AudioLink Map
- Color: Controls the color of the effect
You can use the alpha channel of the AudioLink Map to control the overall intensity of the effect and smooth-out the edges when in Packed Map mode
UV-Based
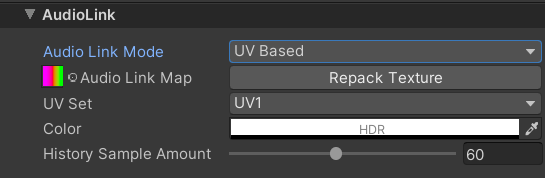 Toon Shader AudioLink UV-Based
UV-Based mode uses the UV coordinates of the mesh to display audio link history. This mode is very useful for creating scrolling effects.
- AudioLink Map: The mask texture to control which areas of the material are affected by the AudioLink effect
- UV Set: Controls the UV channel used when sampling the AudioLink Map as well as the UV channel used to sample the AudioLink history
- Color: Controls the color of the effect
- History Sample Amount: Controls how much of the AudioLink history will be sampled. Smaller values will visually speed-up the effect
UV Layout
The UV layout you should use is similar to the ORL Standard AudioLink effect, where the Y axis is split into 4 parts, each representing a frequency band. The X axis is used to sample the history.
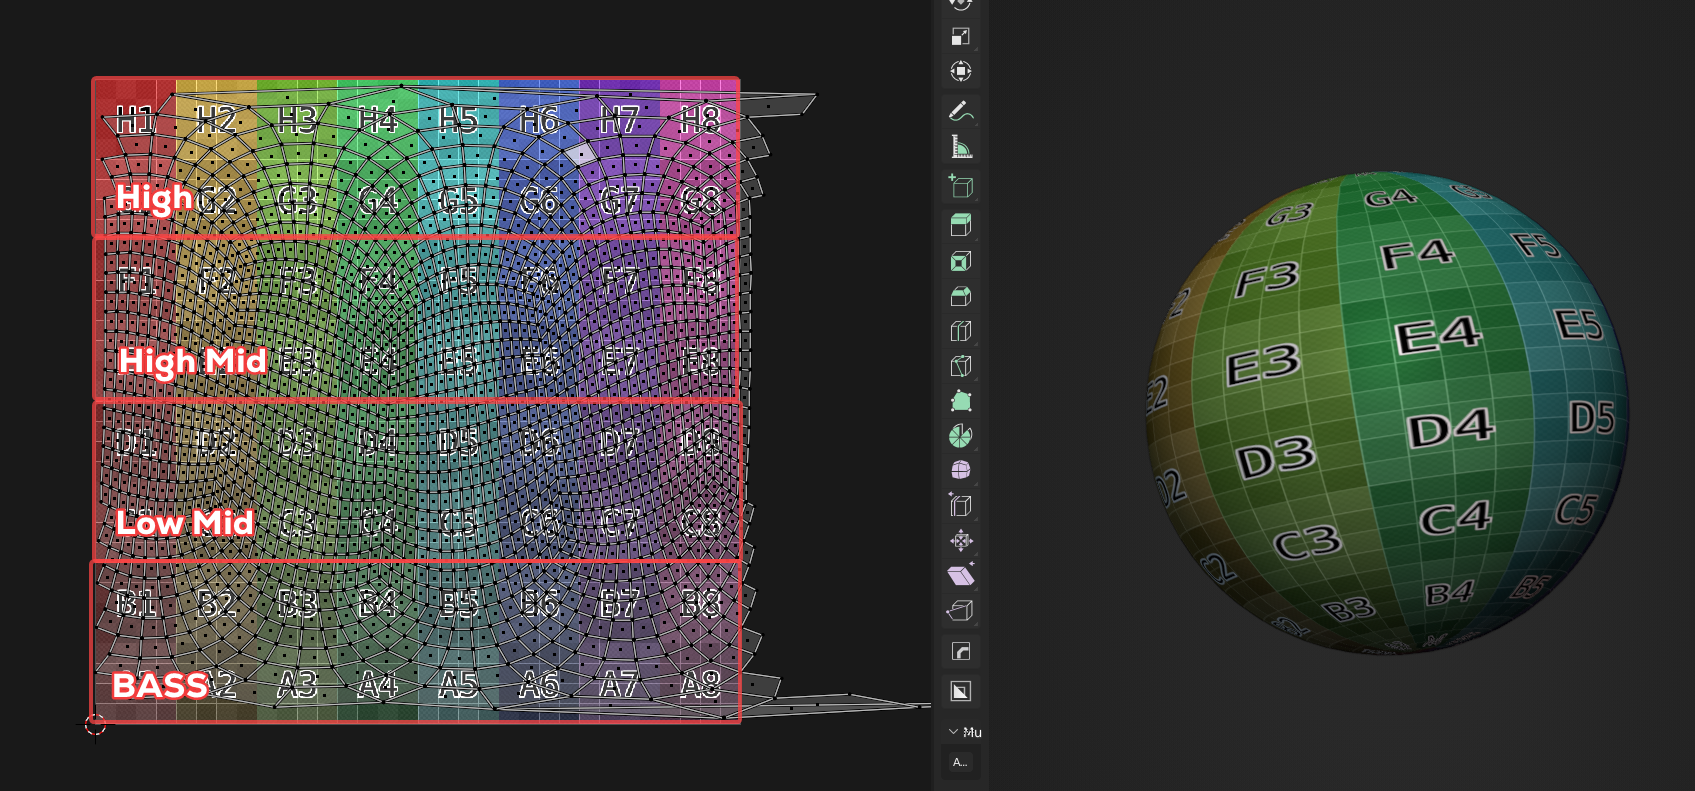 UV Layout Reference
Emission
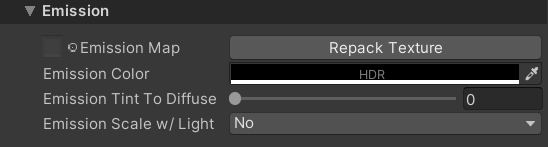 Toon Shader Emission
- Emission Map: The emission map to use
- Emission Color: Controls the color of the emission
- Emission Tint To Diffuse: Controls the amount of albedo tint applied to the emission. This will help saturate the emission color
- Emission Scale w/ Light: Controls whether the emission should be adjusted based on the current light intensity. This allows you to make it so your material only glows in the dark. Default is "No"
- Scaling Sensitivity: Only visible if Emission Scale w/ Light is set to "Yes". Controls the the light level needed to turn off Emission. The emission will only be visible if the current lighting is less than the value specified, e.g. if set to 0.5 - the emission will show up when the light is 0.49 and lower
Rim Light
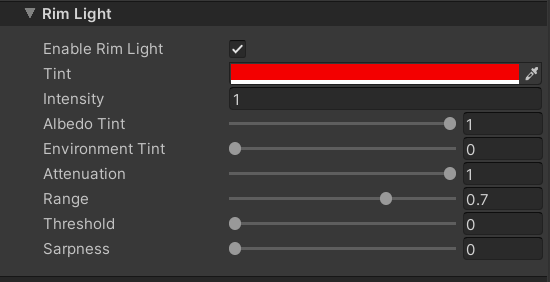 Toon Shader Rim Light
- Enable Rim Light: Enables the rim light effect
- Tint: Controls the color of the rim light
- Intensity: Controls the intensity of the rim light
- Albedo Tint: Controls the amount of albedo tint applied to the rim light
- Environment Tint: Controls how much the rim light will be tinted by the environment reflections and lightprobes
- Attenuation: Controls how much the rimlight will be visible in shadowed areas. 0 - always visible
- Range: Controls how far the rim light will extend into the mesh. 0 - will cover all of the mesh no matter the angle to the camera
- Threshold: Controls how much the rim light will be offset by the light direction. 1 - Will only show up in the areas hit by the light, 0 - will show up everywhere
- Sharpness: Controls the sharpness of the rim light. If set to 1 - will become a flat color with a sharp edge instead of a smooth gradient
Rim Shadow
 Toon Shader Rim Shadow
Rim shadow is an interesting effect that emphasizes the curved shapes of the mesh by darkening the material at glancing angles. At times can even mimic a simple AO effect.
- Enable Rim Shadow: Enables the rim shadow effect
- Tint: Controls the color of the rim shadow. If set to white - no rim shadowing effect will be applied, as it multiplies the color underneath
- Range: Controls how far the rim shadow will extend into the mesh. 0 - will cover all of the mesh no matter the angle to the camera
- Threshold: Controls how much the rim shadow will be offset by the light direction. 1 - Will only show up in the areas in shadow, 0 - will show up everywhere
- Sharpness: Controls the sharpness of the rim shadow. If set to 1 - will become a flat color with a sharp edge instead of a smooth gradient
- Albedo Tint: Controls the amount of albedo tint applied to the rim shadow. Works well with skin materials as it can add a little redness to the shadowed areas
Advanced Settings
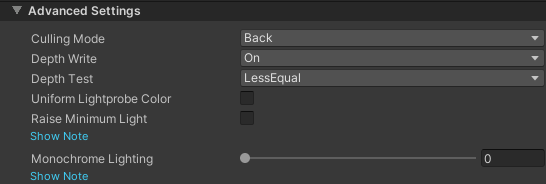 Toon Advanced Settings
- Culling Mode: Controls the culling applied to the mesh
- Back: Culls visible backfaces
- Front: Culls visible frontfaces
- Off: Renders in double-sided mode
- Depth Write: Controls whether the object writes to depth
- Depth Test: Controls how the depth testing is performed, you generally never need to change this
- Uniform Lightprobe Color: Samples the lightprobe color uniformly instead of using mesh normal directions. Can be useful for more stylized looking lighting.
- Raise Minimum Light: Increases the minimum lighting level of the material in environments with no lighting data
- Monochrome Lighting: Controls how much the color of the environment lighting affects the object's color. At 1 only the intensity of the environment lighting is used, while the color is ignored.