Shader Generator
Development Basics
ORL Shader Generator is a text-based shader-generator framework that powers ORL Shader Package. You can use it for your own shaders as well and this guide will walk you through the basics of that process.
Why a generator?
The main reason I built this generator is to allow me to easily create new shaders and effects without having to write the same code over and over again. It also allows me to easily add new features to all of my shaders at once, without having to go through the process of updating each shader individually.
While unity provides a built-in way to manage shader "submodules" of sorts via the #include directive, it is very inflexible, and can only include raw cg/hlsl code instead of working on ShaderLab level.
ORL Shader Generator allows shaders to be split into shader bases and individual modules, which can then be combined together in different ways to create different final shaders. Each module, in turn, can dictate its Properties, Variables, Textures, Functions and even submodules, which will then be recursively gathered and de-duplicated.
Altogether it allows me to create a full PBR shader with an extra overlay texture slot in just a few lines of code, and leave the rest of the shader to be handled by the generator.
Here's an example
%ShaderName("Texture Overlay")

%Properties()
{
    _OverlayTex("Overlay Texture", 2D) = "white" {}
}

%Variables()
{
    half4 _OverlayTex_ST;
}

%Textures()
{
    TEXTURE2D(_OverlayTex);
    SAMPLER(sampler_OverlayTex);
}

%Includes()
{
    "@/Shaders/ORL Standard",
    "self"
}

%Fragment("TextureOverlayFragment")
{
    void TextureOverlayFragment(MeshData d, inout SurfaceData o)
    {
        half2 uv = d.uv0.xy * _OverlayTex_ST.xy + _OverlayTex_ST.zw;
        half4 overlayTex = SAMPLE_TEXTURE2D(_OverlayTex, sampler_OverlayTex, uv);
        o.Albedo *= overlayTex;
    }
}
This will output a fully-functional PBR shader, with all the metallic/smoothness/emission slots you would expect, and an extra overlay texture slot that will multiply the albedo of the object by the overlay texture.
I have a bit more thoughts in the subject in this blog post, although it was written before I made my own system. Back then I relied on Modular Shader System, which achieves similar goals but relies heavily on UI-based tools.
Features
- Built-in support for PBR, Toon and Unlit shaders
- Modular structure with infinite module nesting support
- Making a new shader takes less than a dozen lines of code
- VR w/ SPS-I, Lightmapping, Shadowcasting and Bakery support
- Many included utilities to help with day-to-day shader tasks
- CoreRP sampling macros for texture sampling
- Export to single-file shaders for easy distribution
Installation
Unity Package Manager
You can add this package to any unity project if you have git installed by simply using the following git url in the package manager:
https://github.com/orels1/orels-Unity-Shaders.git#packages?path=Packages/sh.orels.shaders.generator
Unity Package
You can download the latest version of the generator as a unitypackage here. You need to download the sh.orels.shaders.generator-X.X.X.unitypackage file.
VRChat Creator Companion
VCC Listing Coming Soon
Add this repo listing to your VCC
// future URL here
Afterwards - add ORL Shader Generator package to your project
Having issues? Hop by the discord
Updating
Simply download the latest release and import it into your project
Introduction
ORL Shaders are built using my own shader generator system which is included in the repository. And while you can just use the shaders that come pre-packaged in the core package, I encourage you to check out the generator, which allows you to easily add effects on top of my existing code, leveraging all of the PBR/Toon lighting and setup in an easy way.
This is achieved by using a special ScriptedImporter-powered ORL Shader Definition. Which provides you with a way to define a whole shader via a couple lines of code, and focus on what actually matters - the shader-specific Vertex and Fragment code.
Similarities
If you ever used BetterShaders - some of these things will look familiar. As I used to use that system as the backbone of my own shaders. But extending lighting models for BetterShaders is a bit more complicated than I prefer, so after exploring the open source systems that are out there - I ended up building my own.
Creating a Shader
To create a new shader with ORL shaders - create a new file in your project and call it, for example MyShader.orlshader.
Then open that file with a text editor and add the following
%ShaderName("My Shader")

%Properties()
{
    _MainTex("Main Texture", 2D) =  "white" { }
}

%Textures()
{
    TEXTURE2D(_MainTex);
    SAMPLER(sampler_MainTex);
}

%Variables()
{
    half4 _MainTex_ST;
}

%Fragment("MyFragment")
{
    void MyFragment(MeshData d, inout SurfaceData o)
    {
        half2 uv = d.uv0.xy * _MainTex_ST.xy + _MainTex_ST.zw;
        half3 albedo = SAMPLE_TEXTURE2D(_MainTex, sampler_MainTex, uv).rgb;

        o.Albedo = albedo;
    }
}
You can now right click on the newly created shader, and click Create -> Material to quickly create a new material from that shader.
It will look something like this
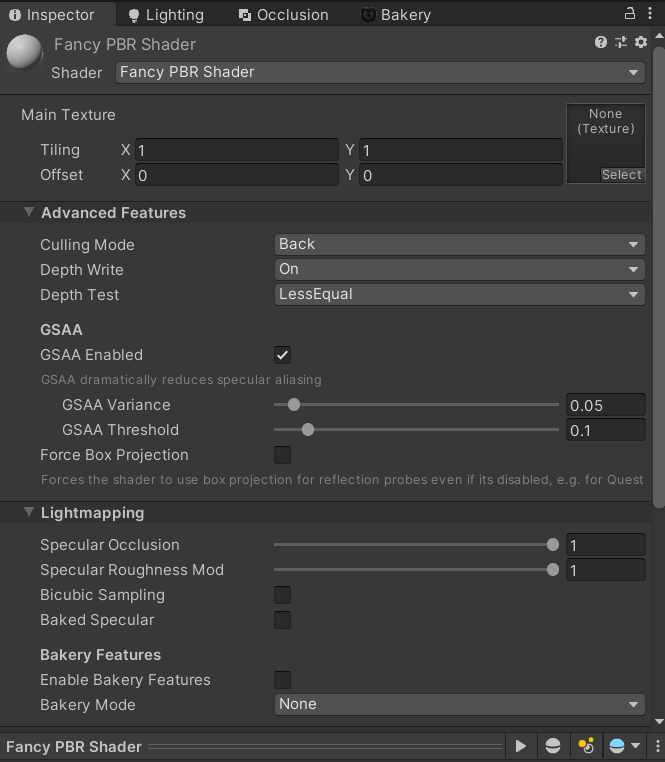 Newly created material
For ease of use - I recommend creating a sphere in the scene and dropping that material onto it, so you can instantly see the changes.
Adding your first effect
Now that you have an .orlshader file created - open it in any editor of your choice.
A basic setup with a simple fragment function that samples the main texture will be provided to you.
%Fragment("MyFragment")
{
    void MyFragment(MeshData d, inout SurfaceData o)
    {
        half2 uv = d.uv0.xy * _MainTex_ST.xy + _MainTex_ST.zw;
        half3 albedo = SAMPLE_TEXTURE2D(_MainTex, sampler_MainTex, uv).rgb;

        o.Albedo = albedo;
    }
}
Let's quickly go over this code line-by-line
%Fragment("MyFragment")
Things that start with % are special generator directives. In this case - we're defining a new fragment function and tell the generator that it should look for MyFragment function in the code below.
Specifying the function allows you to add any utility code you might need for that specific function in the same code block, the generator will only call into w/e you specify inside the directive.
%Fragment("MyFragment")
{
  // code
}
Most % directives contain a codeblock surrounded by a familiar set of curly braces. This is where you can add your code.
Some directives do not use curly braces, those are usually used at the top of the file and define global settings like ShaderName or CustomEditor parameters
void MyFragment(MeshData d, inout SurfaceData o) {
Here we add our function code, in this case we only have a singular Fragment function which will be directly called in the Fragment stage. We also define some input parameters in the signature. Naming MATTERS here, as they will be directly copied into the call signature.
The built-in templates provide the following parameters
- In Fragment, Meta and Shadow functions
- MeshData d
- FragementData i
- SurfaceData o
- In Color functions
- MeshData d
- FragementData i
- SurfaceData o
- half4 FinalColor
- In Vertex functions
- VertexData v
- FragmentData o
In this case we want to get the mesh UVs from the MeshData (parameter d, for "data") and output the albedo color which is stored in a SurfaceData (parameter o, for "output")
half2 uv = d.uv0.xy * _MainTex_ST.xy + _MainTex_ST.zw;
half3 albedo = SAMPLE_TEXTURE2D(_MainTex, sampler_MainTex, uv).rgb;

o.Albedo = albedo;
The rest is just regular shader code. We adjust the UVs by Tiling and Offset parameters, sample the texture and pass it to the albedo.
Texture sampling macros
SAMPLE_TEXTURE2D might look unfamiliar to people used to Built-In RP. It's a macro that is always included by the generator. When using the Built-In render pipeline - this is a direct embed of SAMPLE_TEXTURE2D from the CoreRP package, which allows you to sample textures in a way that is compatible with any of the newer Unity rendering pipelines, which can help migrate your shader code between them if that is ever needed.
Let's expand it a bit by adding a tint color and emission texture. Things are more fun when they glow!
Add new Properties
As with the regular shaders - you'll need to define your properties so they can be set in the editor.
In the .orlshader that is done via the %Properties() block. It works the same way as it normally would.
Add a _EmissionMap texture and a _Color to the properties block. It should now look like this
%Properties()
{
    _MainTex("Main Texture", 2D) = "white" {}
    _Color("Tint", Color) = (1,1,1,1)
    _EmissionMap("Emission", 2D) = "black" {}
}
Add a Texture variable
Now that you have your property added - we need to create a variable to use it in the actual fragment function.
As mentioned earlier, .orlshader built-in templates provide you with a nice CoreRP based sampling library, which unifies the sampling code across all possible platforms. We're gonna use that here!
CoreRP sampling lib
If you're curious, you can check out the sampling library here!
To define a texture variable - simply use TEXTURE2D(_EmissionMap); And to define a SamplerState - use SAMPLER(sampler_EmissionMap);
For the rest of the variables - syntax is exactly the same as usual.
Now all together it should look something like this
%Variables()
{
    float4 _MainTex_ST;
    half4 _Color; // our tint color
}

%Textures()
{
    TEXTURE2D(_MainTex);
    SAMPLER(sampler_MainTex);
    TEXTURE2D(_EmissionMap); // our newly created texture
    SAMPLER(sampler_EmissionMap); // the sampler for the texture
}
Doing that allows us to use this texture in our fragment function!
Variables and Textures separation
We keep Textures and Variables here separate, because in URP/HDRP - the variables must be explicitly defined inside of a CBUFFER that is shared across all passes. While textures are defined per-pass, same way as they are in Built-In RP. To simplify the code generation and allow for same shader code to be used across pipelines - we split them into two separate blocks.
Tint the Main Texture
Manipulating the main texture that is already provided in the template is super easy!
As you can see - the value of that texture is being assigned to an o.Albedo field of our surface struct.
You can see what other fields are available here.
void MyFragment(MeshData d, inout SurfaceData o)
{
    half2 uv = d.uv0.xy * _MainTex_ST.xy + _MainTex_ST.zw;
    half3 albedo = SAMPLE_TEXTURE2D(_MainTex, sampler_MainTex, uv).rgb;

    albedo *= _Color; // tint the sampled texture by our tint color

    o.Albedo = albedo;
}
Sample the Texture
Now we can actually sample the texture and display some colors!
Since we're using the sampling library - the sampling process can also benefit from those macros.
You can use SAMPLE_TEXTURE2D(<texture>, <sampler>, <uv>) to get the values.
Other texture types
For other textures like 3D or Cubemap, as well as sampling specific mipmaps - just adjust the name of the macros accordingly.
For example, SAMPLE_TEXTURE2D_LOD allows you to pass a specific mip level. and SAMPLE_TEXTURECUBE allows you to sample cubemaps!
You can look up the full list of macros in the CoreRP sampling library
Now let's sample the texture!
void MyFragment(MeshData d, inout SurfaceData o)
{
    half2 uv = d.uv0.xy * _MainTex_ST.xy + _MainTex_ST.zw;
    half3 albedo = SAMPLE_TEXTURE2D(_MainTex, sampler_MainTex, uv).rgb;

    albedo *= _Color; // tint the sampled texture by our tint color

    o.Albedo = albedo;

    half3 emission = SAMPLE_TEXTURE2D(_EmissionMap, sampler_EmissionMap, uv).rgb;
    o.Emission = emission;
}
As you can see - its pretty straightforward. The actual lighting calculations are handled by the Lighting Model of your choosing (which is PBR unless specified otherwise).
Regenerate the shader
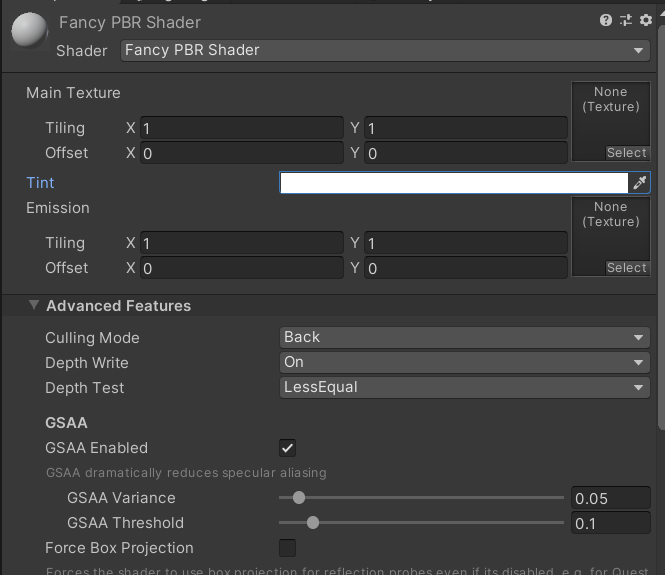
Now that you have made your changes - save the file and switch back to Unity. (If you have auto-refresh disabled - you'll need to press Ctrl+R for the shader to be updated).
You should see your newly added Emission texture and Tint color in the inspector now!
Next Steps
From here you can go as deep as you want adding all kinds of fancy effects!
And I also encourage you to check out the ORL Shader Definition documentation for all the things available to you in the .orlshader file!
And if you want to learn more about creating modules that can be composed together - check out this page.