Standard Shaders (PBR)
Layered Parallax Shader
Options relevant to the orels1/Standard Layered Parallax shader
A multi-layer parallax shader with various per-layer effects. Generally aimed at things like Posters and other similar applications
An example poster-style image using the Layered Parallax shader
General Settings
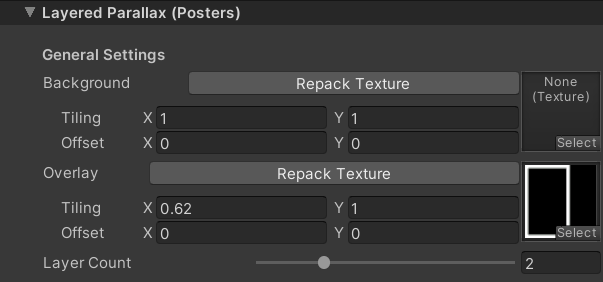 Layered Parallax Inspector
Most of the settings are controlled per-layer, and each layer has an identical set of settings. However the Background and Overlay layers are special, and thus they're hoisted to the General Settings section
- Background: Specifies a texture everything is going to be overlayed on. Does not have any parallax offsets
- Overlay: Specifies a texture that is going to exist on top of everything with no depth offset. Can be used to add some sort of a frame or any other top-level effects
- Layer Count: Controls the amount of parallax layers applied. Uses branching internally to cut on the cost of the effect. Goes from 1 to 5
Per-Layer Settings
Each layer has an identical set of settings, so they are only documented once
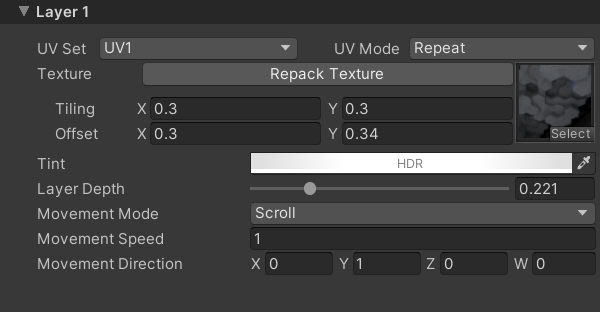 Layer Inspector
- UV Set: The UV channel to use for the texture. Channels 1 through 4 are available
- UV Mode: Controls whether the texture should be clamped or repeated. This is done on the shader level due to optimization reasons. It is highly recommended to keep the first layer's texture in the Repeat mode in the texture importer settings
Clamping Caveats
Clamped mode only works with the None and Float Movement Mode settings. As it does not make sense to scroll the clamped texture away from the visible area
- Texture: Specifies the texture used by the layer
Texture Requirements
You must provide a texture in the first layer texture slot, otherwise the shader will not work
- Tint: Controls the tint color of the layer's texture. It is an HDR value to allow for emissive elements. Adjusting the alpha of the Tint also allows for blending between layers
- Layer Depth: Controls the perceived depth of the texture. All the layers are visually flat, but can be on a different distance from the surface
- Movement Mode: Controls the layer's behavior. Has multiple options
- None: No movement
- Float: Bobs the texture back and forth in a specified direction
- Scroll: Scrolls the texture in the specified direction
- Movement Speed: Only visible if the Movement Mode is not set to None. Controls the speed of the movement effect
- Movement Direction: Only visible if the Movement Mode is not set to None. Controls the direction of the movement effect. Only the X and Y values are used
Here's an example of setting up a simple two-layer effect using this shader
Layered Parallax Example