Shader Inspector
Inspector Overview
ORL Shader Inspector is a Property-based shader GUI system for Unity. It is designed to be easy to use and extend, without requiring you to write much, if any, C# code when developing new shaders.
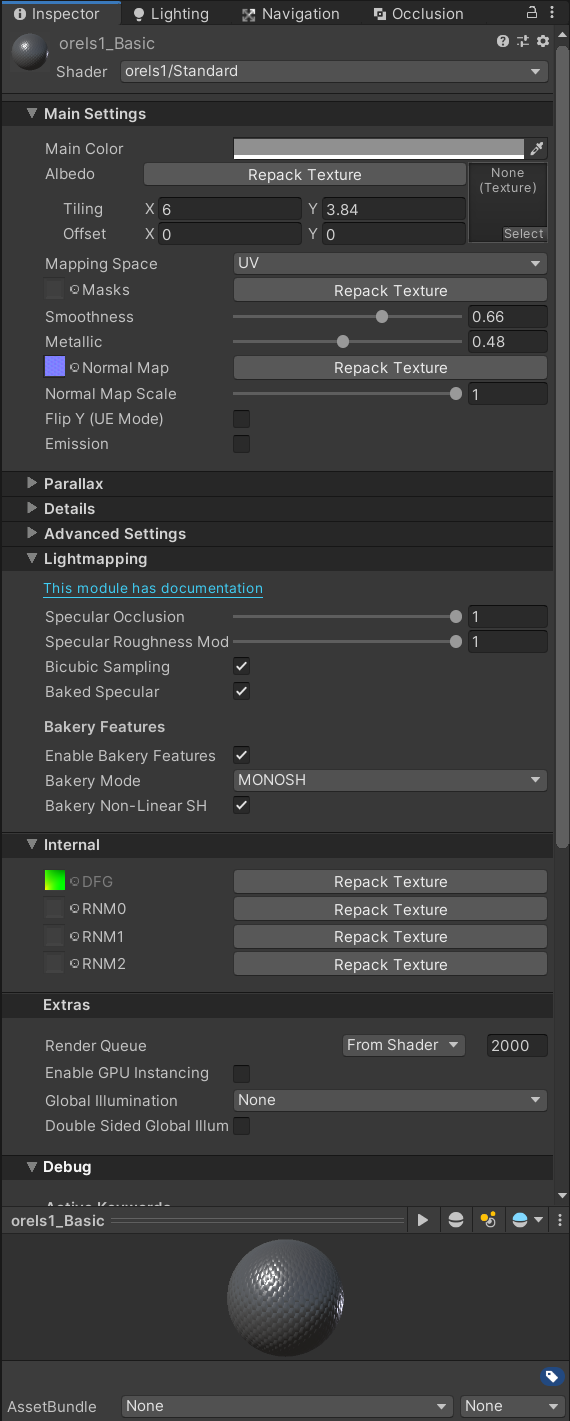 ORL Shader Inspector used for ORL Standard shader
Features
- H1, H2, and H3 headers
- Headers acting as foldouts with default expanded states
- Min/Max Sliders
- Gradients generator
- Texture-based keywords
- ShowIf conditions for property visibility control
- Property combining for rendering multiple properties on a single line
- Texture Packing
- Keyword debugging
- Presets
- Setting props based on other props
And many more...
Installation
Unity Package
You can download the latest version of the inspector as a unitypackage here. You need to download the sh.orels.shaders.inspector-X.X.X.unitypackage file.
Unity Package Manager
You can add this package to any unity project if you have git installed by simply using the following git url in the package manager:
https://github.com/orels1/orels-Unity-Shaders.git#packages?path=Packages/sh.orels.shaders.inspector
VRChat Creator Companion
Add this repo listing to your VCC
// future URL here
Afterwards - add ORL Shader Inspector package to your project
Having issues? Hop by the discord
Updating
Simply download the latest release and import it into your project
Usage
To use the inspector, simply reference it via the CustomEditor keyword in your shader
CustomEditor "ORL.ShaderInspector.InspectorGUI"
When using ORL Shader Generator, you can use it by simply adding the following block
%CustomEditor("ORL.ShaderInspector.InspectorGUI")
Headers
Headers are used to group properties together. The H1 top-level headers generate foldouts, while H2 headers simply appear as bold labels. H3 is uses the minibold label style.
To add a header, simply add the following property to the list of your shader properties
UI_SomeHeader("# Some Header", Int) = 0
 H1 Header
The default value you provide will specify if the section will be expanded or collapsed by default. So if you pass 1 - the section will be expanded.
H2 headers are added in a similar fashion, although the default value does not matter as they aren't foldouts. Same goes for H3.
UI_SomeSubheader("## Some Subheader", Int) = 0
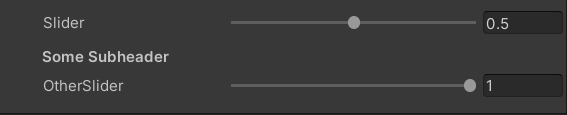 H2 Header
Prefix your properties with UI so they won't ever clash with any shader properties and clearly indicate that they do not bear any shader-specific meaning.
Horizontal Separators
You can add horizontal separators in the Shader Inspector via ---
UI_Separator("---", Int) = 0
Min/Max Sliders
It is often useful to provide remapping functionality to your shader properties. For example, you might want to remap a value from 0-1 to 0.1-0.8, to increase contrast of a Smoothness texture for example, or define an operating range of some modifier.
To do so, you can use the %RemapSlider() function.
_SmoothnessRemap("Smoothness %RemapSlider(0,1)", Vector) = (0,1,0,0)
 Min Max Slider
This will generate a Min Max Slider that operates in the 0-1 range as defined by the arguments passed into the RemapSlider function.
This means you can define any arbitrary range you want, e.g., if you want a slider that works within -10 to 10 range, you can do so as such
_MovementRange("Movement Range %RemapSlider(-10,10)", Vector) = (-5,5,0,0)
The default values you provide to the Vector constructor at the end - will be used to initialize the slider.
You can access your newly remapped values in the x and y components of the vector.
Conditional Properties
In complex shaders - there is often a need to hide and show properties based on other properties, defined shader keywords or passed textures.
This why ORL Shader Inspector ships with a fairly in depth property condition system. The %ShowIf() function allows you to define a condition that will be evaluated and hide or show the property based on the result.
The most basic usage looks like this
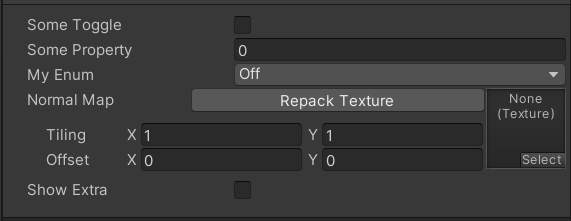
[Toggle(KEYWORD_ON)]_Keyword("Some Toggle", Int) = 0
_SomeProperty("Some Property %ShowIf(KEYWORD_ON)", Float) = 0
![]() Show If Hidden
Show If Hidden
This will only show the _SomeProperty property if the KEYWORD_ON is enabled. Otherwise the property will be completely hidden.
 Show If Shown
The list of supported conditions is as follows
- Keywords, true if defined
- Textures, true if set
- Float and Int properties
- Can be used as True/False, where any non-zero value will return True
- Can also be used with direct value comparison, which is useful for
Enumproperties
Note that, at this moment, comparing to numbers with decimal points is not supported
All of the above can be inverted with ! as well as combined in many ways using the && and || operators and parentheses.
That means you can do something like this
_SomeExtraProperty("Some Extra Property %ShowIf(SHOW_EXTRA && (KEYWORD_ON || _SomeProperty > 2) && _MyEnum != 1 && !_BumpMap)", Float) = 0
Where this property will only be shown if
SHOW_EXTRAis defined- And either
KEYWORD_ONis defined or_SomePropertyis greater than 2 - And
_MyEnumis not equal to 1 - And
_BumpMaptexture is not set
 Show If Hidden
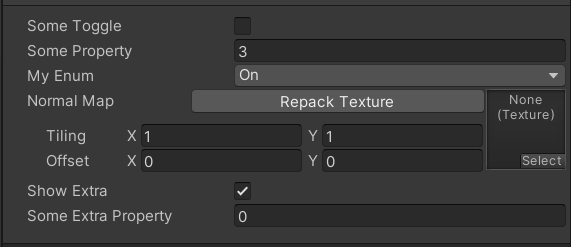 Show If Shown
Any complex shader GUI is bound to use this Function the most
Property Combining
There is often a need to combine multiple properties into a single line. For example you might want to provide channel remapper, which requires 4 Enum properties on the single line.
The %CombineWith() function allows you to do just that.
[Enum(R,0,G,1,B,2,A,3)]_MetallicChannel("Metallic %CombineWith(_AOChannel, _DetailsChannel, _SmoothnessChannel)", Int) = 0
[HideInInspector][Enum(R,0,G,1,B,2,A,3)]_AOChannel("AO", Int) = 1
[HideInInspector][Enum(R,0,G,1,B,2,A,3)]_DetailsChannel("Details", Int) = 2
[HideInInspector][Enum(R,0,G,1,B,2,A,3)]_SmoothnessChannel("Smooth", Int) = 3
 Combine multiple properties
Since the rest of the properties are already rendered by the root _MetallicChannel, we can safely HideInInspector everything that gets bundled inside CombineWith.
Texture-based Keywords
Sometimes you might want to define a keyword based on the presence of a texture. For example, you might want to enable a keyword if a _BumpMap texture is set to skip sampling the normal map unless its present.
To do so, you can use the %SetKeyword() function.
_BumpMap("Normal Map %SetKeyword(_BumpMap, NORMALMAP_ON)", 2D) = "white" {}
This way you can add a relevant shader_feature and wrap your sampling code in #if defined(NORMALMAP_ON) so it will only be executed if the texture is set.
Since the texture property is passed explicitly - that means you can add a texture-based keyword for a texture declared in a different module to toggle something inside of yours. Especially useful for normal maps, e.g. if you want to do a fairly expensive normal/tangent recalculation if a normal map was set by a prior module.
Gradient Generator
ORL Shader Inspector ships with a built-in Gradient Generator, which allows you to generate a gradient texture on the fly.
_Gradient("Gradient %Gradient()", 2D) = "white" {}
 Gradient
The above will generate a simple gradient picker with a black-to-white gradient pre-filled, but not generated as a texture.
You can also pass a default value to the function, which will be used to initialize the gradient.
_Gradient("Gradient %Gradient((0,1,0,1), (1,0,0,1))", 2D) = "white" {}
 Gradient with Default
This will generate a Green to Red gradient, which you can then modify.
Since the gradients are not textures as is, you will need to click the "Save Gradient" button to actually generate the texture to be used by the shader.
The regular texture slot is also kept so you can pass any other texture you want to use instead.
Its important to note that the gradient data is stored on the Material itself, so if you drag the generated gradient texture into a different material, it will pick up the gradient it was generated from. But you can always go back to the original material and save that gradient as a preset if you want to reuse it as a base for new gradients.
Don't forget to save!
The inspector will always display a warning message reminding you to save your gradients into textures, if the texture slot is empty. Unfortunately, for gradient slots that are already populated - you'll need to remember to save your gradients manually.
Required Textures
Sometimes you might want to require a texture to be set, as well as provide a default value for it. Baked noise masks and other atlases are often good candidates for this.
To do so, you can use the %RequiredTexture() function.
_NoiseMask("Noise Mask %RequiredTexture(Asset/Textures/BakedNoise)", 2D) = "white" {}
This will auto-set the texture from the provided path if no texture is currently provided. To make the system more flexible, though, it also allows the user to pass a different texture into the slot and the system will not override it.
Texture Packer
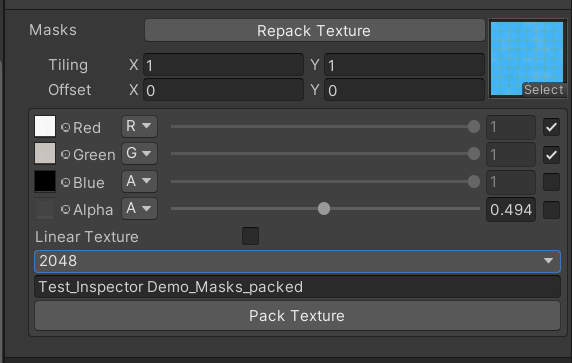
ORL Shader Inspector ships with a built-in Texture Packer, which is most handy for optimizing your texture taps, as well as working with various asset packs that might not have textures in a compatible format.
 Texture Packer
You do not need to do anything special to display the packer, every texture slot will have a Repack Texture button near it which will bring up the packing UI.
Here you can specify which textures to use, fill values for cases when no texture is passed, as well as invert the final result.
The textures are loaded directly from disk to avoid any texture compression issues and save with High Quality compression by default.
Note Field
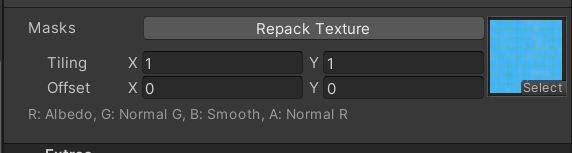
Sometimes you want to add inline documentation to your properties, like listing which channels are used for what, or what the texture is supposed to be.
To do so, you can use the markdown quote notation like this
UI_ChannelsNote("> R: Albedo, G: Normal G, B: Smooth, A: Normal R", Int) = 0
 Note
Note
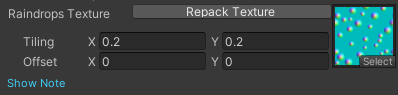
You can also make a note that is hidden by default, but can be expanded by clicking on a "Show Note" button. This is most useful for very long notes that use newlines (via \n).
UI_ChannelsNote("?> R: Albedo\nG: Normal G\nB: Smooth\nA: Normal R", Int) = 0
 Note Hidden by Default
Link Field
You might also want to link full external documentation in your inspector, and for that a markdown link notation is used
UI_DetailsDocs("[This module has documentation](https://shaders.orels.sh/docs/orl-standard/base-shader#details)", Int) = 0
 Link
Link
Single-Line Textures
While full-size texture slots with Tiling and Offset fields can be useful, often you want to render a single-line texture slot, which is more compact and takes less space.
To do so - add a > after the texture property display name
_BumpMap("Normal Map >", 2D) = "bump" {}
 Single Line
Presets
It is often nice to provide users with easily findable presets. And while simply adding a bunch of Unity Preset files somewhere in your package is a good place to start - it is much better to show a subset of specific presets in the inspector.
This is what a %Preset() function is for.
UI_Preset("Select Preset %Preset(Path/To/Presets/Folder)", Int) = 0
This will render a dropdown with all the presets found in that folder. When the user selects a new preset - they'll get a popup explaining that this will clear all of their settings and set them to the values provided in the preset.
The selected preset index will then be saved into the property the %Preset() function is added to.
 Patterns Shader using Presets
Setting Prop values based on other Props
Sometimes it is useful to set a property value based on a keyword or some other prop, especially an Enum one.
For example, you might want to set a bunch of Stecil properties based on whether the Outline is enabled or not.
For that use case a %SetProp() function is provided.
_Outline("Enable Outline %SetProp((OUTLINE_ENABLED), _StencilBasePass, 2, 0)", Int) = 0
The above code will set the _StencilBasePass prop to 2 if OUTLINE_ENABLED keyword is set, or 0 otherwise.
The syntax of conditions is the same as in the Conditional Properties section.
The signature of the function is as follows
%SetProp((<condition>), <prop>, <true value>, <false value>)
The parenthesis around the <condition> are required, so make sure they are there
Setting an Override tag based on an Enum
Unity allows you to modify Shader Tags per-material, which can be useful in cases where shader might be supporting multiple rendering modes, such as Transparent or Cutout.
The %OverrideTag() function allows you to do exactly that
[Enum(Standard, 0, Toon, 1)]_VRCFallbackTag("VRC Fallback %OverrideTag(VRCFallback)", Int) = 0
The above code sets the VRCFallback tag to either Standard or Toon based on the selected value
Bakery Volume Assigner
Allows you to assign bakery volume textures to a material by drag & dropping the Volume object onto a field.
UI_BakeryVolumeAssigner("Volume Assigner %BakeryVolumeAssigner()", Int) = 0
Shows an "Unset Volume" button if some data is set.
Vector 2 Field
Shows a Vector 2 field for a vector property, instead of a usual Vector4. Can be used with custom names for each vector component
_HotspotDirtMaskParams("Edge Masking %Vector2(Mask Min, Mask Max)", Vector) = (0, 100, 0, 0)
The names are mandatory.
Vector 3 Field
Shows a Vector 3 field for a vector property, instead of a usual Vector4. Can be used with custom names for each vector component
_HSVAdjustment("HSV %Vector3(Hue, Saturation, Value)", Vector) = (0, 0, 0, 0)
The names are mandatory.
Setting Render Type
If you want to replicate Unity Standard Shader's render type dropdown, you can use the %RenderType() drawer function.
_RenderType("Render Type %RenderType(_BlendOp, _SrcBlend, _DstBlend, _BlendOpAlpha, _SrcBlendAlpha, _DstBlendAlpha, _ZWrite)", Int) = 0
Then you could use the values set by this function inside your shader like this
SubShader
{
    Tags { "RenderType" = "Opaque" }

    BlendOp [_BlendOp], [_BlendOpAlpha]
    Blend [_SrcBlend] [_DstBlend], [_SrcBlendAlpha] [_DstBlendAlpha]
    ZWrite [_ZWrite]

    CGINCLUDE
    // ...
}
Note that the PBR and VFX lighting models already has this functionality built-in, so you don't need to set this up yourself. However, when using a custom lighting model or when using inspector with regular unity shaders - this is a commonly used feature.
Special Tags
Some of the inspector functionality can be controlled via special tags.
ORL_RenderType
This tag allows you to enforce a particular value of the render type enabled by the %RenderType() drawer, prevent the user from changing it.
Tags { "ORL_RenderType" = "Cutout" }
Supported values are Opaque, Cutout, Transparent, Fade, and Custom. The values are case-insensitive, but the tag name is case-sensitive.
Forcing Render Type
If you want to force a particular render type when a property is enabled, you can use the %ForceRenderType() function.
[Toggle(GLASS)]_Glass("Enable Glass %ForceRenderType(Transparent), Int) = 0
Now when the user checks the "Enable Glass" toggle - the render type will be forced to "Transparent".
%RenderType() requirement
This requires the shader to have a %RenderType() function present in some other property, as otherwise the inspector won't know which properties are used to set render type parameters.
You can also provide more parameters to the function, for example, you can pass a specific queue number to set it alongside the render type.
[Toggle(GLASS)]_Glass("Enable Glass %ForceRenderType(Custom, 2501), Int) = 0
In this case - the render type will be set to "Custom" and the queue number will be 2501.
In some scenarios you might also have some types that are compatible with what you want to force, and if they are already set - you might want to keep them (to preserve the user's settings).
In this case, you can define up to 3 compatible types, and the inspector will only set the render type if the property is set to anything but one of those types.
[Toggle(GLASS)]_Glass("Enable Glass %ForceRenderType(Transparent, 3000, Fade), Int) = 0
In this case, the render type will only be forced only if it isn't already set to Transparent or Fade.
Enabling/Disabling passes by LightMode
Unity allows you to enable/disable passes based on their respective Light. This is rarely useful, but in cases where you want to optionally enable, for example, a GrabPass - it can be incredibly handy.
[ToggleUI]_EnableGrabPass("Enable GrabPass %EnablePass(GrabPass)", Int) = 0
Now in your shader, if you give your grabpass a LightMode = GrabPass tag, it will only be enabled if the _EnableGrabPass property is set to 1.
GrabPass {
  Tags { "LightMode" = "GrabPass" }
  "_GrabTexture
}
Requiring input texture to be linear
If a particular texture slot requires linear data input, you can use a Linear drawer function to communicate that to a user and provide an auto fix button.
_Height("Height > %ShowIf(PARALLAX) %Linear()", 2D) = "black" {}
Now the user will get a little message box below the texture slot, if they provide an sRGB texture when a linear texture is expected, with a convenient "Auto Fix" button.
You can also provide a custom message instead of the default one by passing it as an parameter
_Height("Height > %ShowIf(PARALLAX) %Linear(Please use a linear texture)", 2D) = "black" {}
Prioritizing a specific copy of a property
Sometimes you might end up with 2 modules defining the same property. While that is generally undesirable, the generator will automatically deduplicate them to avoid compilation issues.
However, currently this will mean that only the last instance of the property is kept in the final inspector, which might not be what u want.
In that case you can use a %Priority drawer, to specify which instance of a particular property takes priority. For example, lets say you have 2 modules that have properties like this
// Main Module

_EmissionStrength("Emission Strength %Priority(10)", Range(0, 10)) = 0

// Custom Emission Module

_EmissionStrength("Emission Strength", Range(0, 10)) = 0
In a setup like this - when the Custom Emission Module is included together with the Main Module in the final shader - only the first instance will be drawn (as it has higher priority) instead of the last instance (if there was no priority setting).
This is especially useful for providing fallback settings or rearranging commonly used controls across modules for a better user experience.
Combine and Experiment
A lot of the above features are designed to be combined with each other, so you can create complex shader GUIs with ease.
For example, you can make a single-line texture that is only shown when a condition is set, sts a keyword based on its presence, and provides a gradient generator
_SomeSpecialTexture("Special Texture > %ShowIf(_SpecialModuleEnabled) %SetKeyword(SPECIAL_ON) %Gradient()", 2D) = "white" {}